Saturday, June 16, 2012

Hawaiian Chicken Salad Sandwiches


I'm loving the Hawaiian flavors lately. I made Hawaiian BBQ Pulled Chicken Sandwiches a few days ago (which were amazing if I do say so myself =) and I had some left over fresh pineapple so I thought, why not make another Hawaiian inspired dish. These sandwiches are packed with the flavors of the Islands. I tried to think of all foods that remind me of Hawaii when making this recipe (even though sadly I've never been there, what is up with that??). Of course I thought of Hawaiian Pizza, one of my favorites with it's ham and pineapple combo. Then I'd say the first type of nut I think of when I think of Hawaii is Macadamia, and can you have a chicken salad sandwich without some kind of nut? Also, I wanted to add a bit of sweetness to the dressing (but don't worry it's not overly sweet) so I added in the honey and pineapple juice. I don't like a really thick dressing over my chicken salad but if you do you could omit the pineapple juice and add a few more tablespoons of the mayo or some Greek yogurt. I hope you love these delicious Island inspired sandwiches! May they make you feel as though you are vacationing in Hawaii. Enjoy!


Hawaiian Chicken Salad Sandwiches
Yields about 5-6 servings


Ingredients:
1 1/2 lbs cooked chicken breast, chilled and shredded
8 oz cooked ham, chilled and diced
1 1/2 cups diced fresh pineapple (canned would work too, but drain well)
1 cup diced celery (about 3 stalks)
2/3 cup chopped Macadamia nuts or Cashews
2 Tbsp chopped green onions


Dressing:
2/3 cup mayonnaise
1/4 cup pineapple juice
3 Tbsp honey
2 tsp apple cider vinegar
1/2 tsp onion powder
Salt and Pepper to taste


Directions:
In a large mixing bowl, toss together shredded chicken, diced ham, pineapple, celery, nuts and green onions. In a separate mixing bowl, whisk together mayonnaise, pineapple juice, honey, apple cider vinegar, onion powder and season with salt and pepper to taste. Pour dressing over chicken mixture. Toss to evenly coat. Serve on Crusty Rustic Bread, Hawaiian Sweet Bread or whatever bread, roll or croissant you'd like.


Recipe Source: Cooking Classy

Share:

Thursday, June 14, 2012

Doughnut Pancakes with Doughnut Glaze Syrup


Yes. Yes, yes, yes! Doughnuts collide with pancakes to make one unbelievable breakfast (or dessert)! If you want to show someone how amazing you think they are, say for the up coming Father's Day or a birthday then these are a great way to express your love and appreciation for that special someone =). I know I'd feel pretty awesome getting these for breakfast in bed on my Birthday. I'm always trying to think of new recipes, new food ideas and things out of the ordinary. This is a result of one of those random thoughts. I love to create new recipes, you could probably say I'm addicted. It's hard to keep me out of the kitchen basically. These are one of the funnest recipes I think I've made. Who doesn't love a sweet, tender doughnut or a fluffy stack of pancakes? Everyone who tried these thought they were delicious, and the kids faces lit up with utter excitement just upon seeing them. These taste just like cake doughnuts and pancakes in one. They're fluffy, perfectly sweet and melt in your mouth delicious. Can I eat these for every meal =)? Enjoy and share!


Doughnut Pancakes
Yields 10-12 (4-5 inch) pancakes


Ingredients:
2 1/2 cups all-purpose flour
3 1/2 tsp baking powder
1/2 tsp salt
1 1/3 cups milk
2 large eggs
2 Tbsp vegetable oil
2 Tbsp applesauce
3 Tbsp granulated sugar
1/4 cup vegetable oil, for brushing griddle
1 recipe Doughnut Glaze Syrup


Directions:
Preheat an non-stick electric griddle to 375 degrees. In a mixing bowl, whisk together flour, baking powder and salt. In a large mixing bowl, whisk together milk, eggs, 2 Tbsp vegetable oil, applesauce and granulated sugar until well blended. Add in dry ingredients and mix until combine (batter should be slightly lumpy, don't over-mix). Pour half of the batter into a sandwich size ziploc bag and seal bag (I tried pouring all of it into a large ziploc and just found it was easier to work in two smaller batches). Brush preheated griddle generously with vegetable oil (I used a silicone baster and brushed the areas where the pancake batter would be poured. The vegetable oil is an important part of the "fried" doughnut flavor so that's why I stated "generously"). Cut about a 1 inch corner off the ziploc bag (while holding it with the tip pointing upward so the batter doesn't pour right out), then carefully pipe doughnut shapes onto oiled griddle*. Cook pancake until golden on bottom, then lift pancake with a spatula and brush griddle again with vegetable oil then carefully flip to opposite side. Cook opposite side until golden. Repeat process with remaining batter. Serve Doughnut Pancakes warm, with Doughnut Glaze Syrup and sprinkles of course =).


*note: the first one will probably be a practice pancake, the second should look better once you get the feel for it. The batter will spread slightly as it cooks so keep that in mind when judging how large you keep the hole in the center of the circle. Also, after piping each pancake, return bag with the cut opening facing upright so batter doesn't continue to pour out. If you find it too difficult to get the shape you want you could just ladle (and slightly spread the batter so the centers aren't thicker) onto the griddle and do normal shaped pancakes then use a small circle cookie/fondant cutter and cut a circle through the center of the pancake after it's been cooked.


Doughnut Glaze Syrup


Ingredients:
1/4 cup butter
2 cups powdered sugar
1/8 tsp salt
1/2 cup milk
1/2 tsp baking soda
1/2 tsp vanilla extract


Directions:
Melt butter in a medium saucepan over medium heat. Once butter has melted, stir in powdered sugar, salt and milk. Whisk until sugar has dissolved completely then stir in baking soda and whisk for about 30 seconds until frothy. Remove from heat and stir in vanilla. Serve warm over Doughnut Pancakes. Store in refrigerator up to one week.


Share:

Wednesday, June 13, 2012

Cornbread Muffins (Lightened Up But the Best Ever)


I'm a huge fan of anything that is able to be lightened up that can actually outdo its less healthy, original opponent. This muffin is just that! It is my favorite cornbread, EVER! I adapted it from my Lightened Up Cornbread Recipe. I made these because I needed a shorter cooking time than that of the 8x8 pan version since dinner was close to being done, so I thought muffins would be perfect. Any version of this, muffin or cornbread will disappear in a flash. 
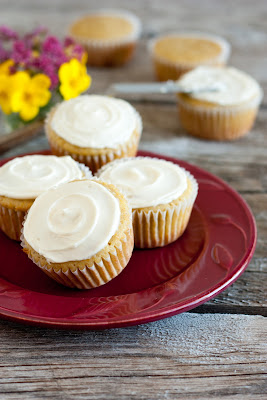
I say these are lightened up because your average cornbread uses a whole stick of butter, with this recipe I use some applesauce as a source of moisture therefore requiring less butter. These are my idea of the most moist and tasty cornbread muffins ever! Then when they are topped off with freshly whipped honey butter, awww my mouth is watering. If you are lucky enough to have any leftover after dinner they make an excellent breakfast the next morning. That's one thing I love about these muffins, they are a perfect side dish to dinner, a great breakfast and even an amazing dessert. They have just the right amount of sweetness. They are making me crave a good Southern Ham meal with some of my Mom's perfect mashed potatoes with ham gravy, mmmm. Good luck stopping at just one muffin, I never can =).


Cornbread Muffins
Yields 18-19 muffins


Ingredients:
1 cup cornmeal
1 cup buttermilk
1 cup all-purpose flour
1 tsp baking powder
1/2 tsp baking soda
1/2 tsp salt
2/3 cup applesauce
1/4 cup butter, melted
2 Tbsp honey
1/3 cup granulated sugar
2 large eggs
1 recipe Whipped Honey Butter, recipe follows


Directions:
In a large mixing bowl, whisk together cornmeal and buttermilk until well blended, allow to rest at room temperature for 30 minutes.  Preheat oven to 375 degrees.  In a bowl, whisk together flour, baking powder, baking soda and salt, set aside.  Add applesauce, melted butter, honey and sugar to cornmeal mixture and whisk until well combine.  Mix in eggs.  Stir in dry ingredients and whisk just until combine and no longer lumpy. Divide mixture evenly among 18-19 paper lined muffin cups filling each one 2/3 full. Bake in preheat oven for 13-16 minutes until toothpick inserted into center of muffin comes out clean. Allow to cool completely if "frosting" with whipped honey butter, or serve warm slathered with whipped honey butter (melty and drippy delicious mmm).


Whipped Honey Butter

Ingredients:
1/2 cup salted butter, softened
1/3 cup honey
1/4 cup powdered sugar

Directions:
In a mixing bowl, with an electric hand mixer, whip together all ingredients until light and fluffy about 2 minutes.


Recipe Source: Cooking Classy (from my Lightened Up Cornbread)


Share:

Hawaiian BBQ Pulled Chicken Sandwiches (Slow Cooker Recipe)


This should be called "The Sandwich of Summer." I made this recipe because I love pulled pork so much so I wanted something similar but entirely its own. Basically I wanted something delicious, out of the ordinary that will make people say "wow." Of course I made it a slow cooker recipe because that's what I love and that's what everyone else seems to love. This Hawaiian BBQ Pulled Chicken Sandwich is bursting with the flavors of the islands (especially when served along with fresh, glazed/grilled pineapple). It inspires me to want to host a luau party in my backyard. 
Don't be scared by the long list of ingredients, most of them, if not all of them, you probably already have in your fridge and cupboard. If you are looking to try a new dish that is enticingly delicious and fully amazing your going to want to try this sandwich! Share and enjoy!


Serve it with or without green onions (I liked it with):


Hawaiian BBQ Pulled Chicken Sandwiches
Yields about 6 sandwiches


Ingredients:
2 lbs boneless skinless chicken breast halves
1/2 cup ketchup
1/3 cup pineapple juice (apple juice could be substituted)
1/4 cup low sodium soy sauce
1/4 cup honey
2 1/2 tsp molasses
1/4 tsp liquid smoke
1/4 tsp coconut extract
1/2 tsp ground ginger
1/2 tsp onion powder
1/2 tsp garlic powder
freshly ground black pepper, to taste


1 Tbsp cold water
1 Tbsp cornstarch
2 Tbsp tomato paste


Directions:
Place chicken in a 6 or 7 quart slow cooker. In a mixing bowl, whisk together ketchup, pineapple juice, low sodium soy sauce, honey, molasses, liquid smoke, coconut extract, ginger, onion powder, garlic powder and black pepper. Pour sauce over chicken in slow cooker, cover with lid and cook on low heat for 5 - 6 hours. Remove chicken from slow cooker, shred and set aside. In a medium saucepan, whisk together cold water and cornstarch, pour in sauce from slow cooker and add tomato paste. Bring mixture to a boil over medium high heat, stirring frequently, then reduce heat and simmer 30 seconds, stirring constantly, until thickened. Return chicken to slow cooker (or the mixing bowl) and pour sauce over chicken, toss to evenly coat. Serve warm on hamburger buns, along with optional glazed or grilled pineapple and optional diced green onions (grilled red onions would be good too). 


I served with glazed pineapple and this is how I did it:


Glazed Pineapple


6 fresh pineapple rings (cut about 1/2" thick)
4 Tbsp brown sugar, divided
1 Tbsp butter, divided


Working in 2 separate batches, melt 1 Tbsp butter in a 10 inch non-stick skillet. Sprinkle 1 Tbsp brown sugar among one side of 3 pineapple rings (about 1 tsp per each), add pineapple to skillet (brown sugar side down) and saute over medium high heat until golden on bottom about 3 minutes. Sprinkle another 1 Tbsp over the tops of pineapple rings in pan (again 1 tsp per each), then flip and cook opposite side until lightly browned about 3 minutes. Repeat this process with remaining 3 pineapple rings.


Recipe Source: Cooking Classy


Share:

Sunday, June 10, 2012

Skillet Chocolate Chip Cookie


I'm officially in love. A giant size chocolate chip cookie, YES! And the whole thing is just for me, YES! Hands off =). This thing is out of this world good, especially when it's served warm with a creamy scoop of ice cream and drizzled with silky caramel and fudge sauce. Words don't describe it's goodness. The recipe I used is My Favorite Chocolate Cookies, the only things I changed were using softened butter instead of chilled since I was making one big huge cookie I thought I'd give it a head start so it wouldn't be too gooey in the middle, and the cooking method was the other obvious change. 
I think I will be making this just as often as I make the individual chocolate chip cookies, yes it is just that good! Warm, chocolaty and decadent with a hint of creaminess (thanks to the coffee creamer powder). This is cookie heaven. If you want to indulge a little more serve it with ice cream and chocolate or caramel sauce. 
In the unlikely event that there's any left after several hours or the next day you can even reheat one of the wedges in the microwave (obviously not in the skillet, on a microwave safe dish and I'd recommend about 10-20 seconds on HIGH power) then top it with ice cream, 
because a skillet cookie is meant to be eaten warm. Enjoy!
PS I think this would make an excellent gift. I was thinking how I would love to get one of these for Christmas. Many people do cookie swaps around the holidays, and seriously would this not be the coolest one ever to get =)? If you know someone feeling down, cheer them up with a giant cookie. I know it would cheer me up when down!


 Not sure why I wanted to do two different pics, I wanted to use my new antique wood prop and test out some recycled packaging paper I guess.


Skillet Chocolate Chip Cookie
Yields 1 ginormous cookie, about 8 -10 servings


Ingredients:
1 1/2 cups all-purpose flour
1 tsp cornstarch
1/2 tsp baking powder
1/8 tsp baking soda
1/2 tsp salt
1/2 cup butter, softened
1 cup minus 2 Tbsp granulated sugar
1 1/2 tsp molasses*
2 1/2 Tbsp original or french vanilla coffee creamer powder
1 large egg
1 1/2 tsp vanilla bean paste, or substitute 1 tsp vanilla extract
1/2 cup milk chocolate chips
1/2 cup semi-sweet chocolate chips


Directions:
Preheat oven to 350 degrees. In a mixing bowl, whisk together flour, cornstarch, baking powder, baking soda and salt, set aside. In the bowl of an electric mixer, whip together butter, granulated sugar, molasses and coffee creamer powder until mixture becomes pale and fluffy, about 4 minutes. Mix in egg and vanilla bean paste. Slowly add in dry ingredients and mix just until combine. Stir in milk chocolate chips and semi-sweet chocolate chips (if you want it to look fancier, I set aside 2 Tbsp of the chocolate chips and after spreading the dough into the skillet, I sprinkled the 2 Tbsp that were set aside over the top then gently pressed them into the dough. I don't like when the chocolate chips don't show through enough). Butter a 10 inch cast-iron skillet (I just buttered by rubbing the pan with a chilled stick of butter). Spread cookie dough into an even layer in the skillet. Bake in preheated oven for 25-30 minutes until golden (note: the cookie will continue to cook slightly once removed from oven so judge accordingly). Allow to cool for about 20 minutes before cutting into slices. Alternately, allow to cool for about 5 minutes and dive into it warm right from the skillet, topped with ice cream drizzled with hot fudge and caramel sauce (that's what I did, warm with cookie dough ice cream, hot fudge and caramel sauce, inexpressibly delicious!).


*if you don't have molasses, alternately you can use 1/2 cup packed light-brown sugar in place of 1/2 cup of the granulated sugar. So, you would be using 1/2 cup light brown sugar and 1/4 cup plus 2 Tbsp granulated sugar.


Recipe Source: Cooking Classy
Share:

Blog Archive