Saturday, November 3, 2012

Nutella Stuffed Chocolate Chip Cookies {with Browned Butter, Vanilla Beans & Sea Salt}


Looking for an exciting and indulgent upgrade on the plain old chocolate chip cookie? Well here you have it! I saw these over at Ambitious Kitchen, a blog I love as well as it's name, and I couldn't wait long to make them. So, I made them the next morning =). I'm telling you, they are one of the best cookies you'll ever eat! I'm unequivocally in love with these purely divine cookies. Have you ever seen a cookie loaded with so much goodness? Browned butter, two kinds of chocolate chips, Nutella, vanilla beans and sea salt! You could even add in some finely chopped, toasted hazelnuts for one more upgrade and an added crunch. 
This cookie = love. You don't know food love until you've tried it =). I want to hoard them all away for myself. I know the prep work is a bit more work and definitely a longer wait than your average chocolate chip cookie but it is so worth it. 
Warning! Don't eat the cookie dough...but it is the BEST cookie dough in the world. Between the browned butter and use of only brown sugar it has such a caramel-like flavor to it. With that said I'll explain how to make it safely edible. Simply omit and replace the eggs with 3 Tbsp cream or half and half, and if you want some Nutella in there simply swirl in a few tbsp and finish it with coarse sea salt (obviously you wont be able to make cookies out of it this way though, but you'll have a giant bowl of cookie dough to enjoy). This recipe reminds me of this print I want to buy, it says "Keep Calm and Eat Cookies." Definitely a great life moto =). Enjoy!


 {Then wrap and bake}


Nutella Stuffed Chocolate Chip Cookies {with Browned Butter, Vanilla Beans & Sea Salt}
Yields about 2 - 2 1/2 dozen

Ingredients:
1 cup salted butter, diced into 1-inch pieces
2 1/4 cups all-purpose flour
1 1/4 tsp baking soda
1/4 tsp salt
1 1/2 cups packed light-brown sugar
2 large eggs
seeds of 2 vanilla beans (or increase vanilla to 2 tsp)*
1/2 tsp vanilla extract
1 cup semi-sweet chocolate chips
3/4 cup milk chocolate chips
about 2/3 cup Nutella, chilled
coarse sea salt 

Directions:
Brown butter in a medium saucepan (for a step by step guide of browning butter, see the directions of this recipe here). Pour browned butter, using a rubber spatula to scrape out any excess, into the bowl of an electric stand mixer and allow to cool until lukewarm, about 20 - 30 minutes. 
In a mixing bowl, whisk together flour, baking soda and 1/4 tsp kosher salt, set aside. Add light-brown sugar to cooled butter in stand mixer fit with paddle attachment. With mixer set on medium-low speed, blend mixture together until well combine, about 1 minute. Add in vanilla bean seeds, and vanilla then add in eggs one at a time and mix until well combine after each addition. Set mixer on low speed and slowly add in dry ingredients and mix just until combine. Mix in chocolate chips (if you want some chocolate chips showing through as those pictured, I like to set some of the chocolate chips aside then I gently press about 5 of them into the top of each cookie dough ball after shaping). Transfer dough to an airtight container and chill in refrigerator about 1 1/2 hours. 
Preheat oven to 350 degrees. Remove dough from refrigerator and scoop dough out about 2 1/2 Tbsp at a time and shape into balls, then align them on a large sheet of parchment or wax paper. Evenly flatten dough balls until you have about a 3 1/4-inch circle, then place 1 tsp chilled Nutella in the center on top of each. Carefully fold dough up and around Nutella, covering it entirely (if you find it beginning to seep through in some areas, I just added a chocolate chip to that spot to act as a plug). Transfer to a Silpat lined cookie sheet (you can fit 8 cookies per sheet) and bake in preheated oven 10 - 12 minutes until golden brown. Remove from oven and immediately sprinkle cookies with coarse sea salt (you can also sprinkle them with sea salt before baking as the salt sticks better that way, I actually did a tiny before and after). Allow to cool several minutes on cookie sheet before transferring to a wire rack to cool. Store in an airtight container.

*For cheap vanilla beans, this is where I purchase mine for .50 cents a piece. Best deal I've found yet.

Recipe Source: adapted slightly from Ambitious Kitchen
Share:

Friday, November 2, 2012

Apple Pie Dip


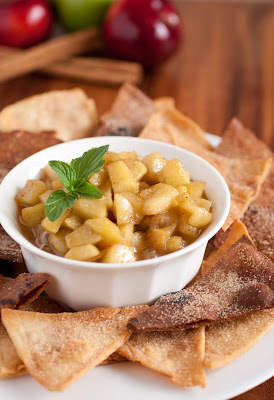
One pin down 1,000 to go. I love when I finally get around to trying that pin I've been wanting to make. I found this over at The Pea Kitchen a few months ago and have thought about making it many times since. I figured Thanksgiving season would be the perfect time. It's pie season! This dip is quick and easy and it tastes just like a delicious apple pie filling. So you get all the flavors of apple pie without the wait and without all that tedious prep work. I think this recipe has also inspired me to sprinkle my apple pie crust with cinnamon and sugar this year, yum!
There are many different ways you could serve this and I've listed in the recipe a few ideas. I left them out of the picture just so you could get a good glimpse of the actual apple pie dip, but If you were to serve it with the ice cream or whipped cream it would be even more like the real thing, and the caramel sauce would just take it over the top.
Also, the cinnamon sugar chips are such a simple and delicious Mexican dessert that can be used for other desserts or they are delicious all on their own. Many Mexican restaurants serve them drizzled with chocolate sauce, caramel sauce and sweetened whipped cream for a simple dessert that is sure to satisfy. Enjoy!


Apple Pie Dip
Yields about 3 servings

Ingredients:
3 cups peeled and diced Granny Smith apples (about 3 medium apples)*
2 tsp lemon juice
1/4 cup + 2 Tbsp packed light-brown sugar
1/4 tsp ground cinnamon
1/8 tsp ground nutmeg
2 Tbsp butter, diced
1 1/2 tsp cornstarch
2 1/2 tbsp water
Fried cinnamon sugar flour tortilla chips for serving, recipe follows
Vanilla ice cream, sweetened whipped cream or caramel sauce, optional

Directions:
Heat diced apples, lemon juice, light-brown sugar, cinnamon and nutmeg in a medium saucepan over medium high heat. Bring mixture to a boil, stirring frequently, then reduce heat slightly and allow to cook until apples are tender. Then add butter and stir until melted. In a small bowl whisk together cornstarch and water until well combine, then while stirring, pour cornstarch mixture over apple mixture and stir until thickened (it should thickena quickly). Serve warm covered with optional sweetened whipped cream. ice cream or caramel sauce along with cinnamon sugar tortilla chips for dipping (alternately you can layer the chips followed by ice cream and finish with apple pie mixture rather than dipping).

*I'd recommend dicing them into very small pieces about 1/4 - 1/2-inch since this is for dipping, it will also help them soften faster.

Cinnamon Sugar Tortilla Chips

Ingredients:
6 flour tortillas, sliced into wedges using a pizza wheel (I did half flour half whole wheat)
1/4 cup granulated sugar
1 tsp ground cinnamon
Vegetable oil, for frying

Directions:
In a small bowl, whisk together sugar and cinnamon, set aside. Line a baking sheet or several plates with paper towels, set aside. 
Fill a large saucepan or cast iron skillet with about an inch of oil and heat over stove-top set at medium to medium-high heat until oil reaches 350 degrees on a deep-frying thermometer. Drop tortilla wedges, about 8 at a time (they should fit in a single layer) in hot oil and cook until bottoms are golden then using metal tongs, flip and cook opposite side and cook until golden. Transfer fried chips to paper towel lined baking sheet then immediately and generously sprinkle with cinnamon sugar mixture (or the sugar won't stick). Best served day prepared.

Recipe Source: apple pie dip adapted slightly from The Pea Kitchen
Share:

Thursday, November 1, 2012

Mom's Mashed Potatoes


With Thanksgiving just a few weeks away I'm so excited to start the month off right and be a part of such a fun virtual progressive dinner! So I want to say thank you to Mother Huddle for asking me to be part of such a great event!
Now regarding this recipe, I need to begin by saying, Mom, you were right. Didn't want to admit it but you are. Cooking the potatoes in the smallest amount of water possible yields better results then covering them entirely with water when cooking them. I know we've had our separate opinions on this but I'd have to say I think the "Food Network" may not always be right :). 
I made potatoes on Sunday, covering them entirely with water to cook, as I usually do because that's what I've always seen them do on Food Network and read in the directions of countless recipes, so I just assume that's the right method. If you ask me, there is no right and wrong way of cooking. They are all just opinions, but yes some methods yield better results then others. Well, my Sunday potatoes were much more "water logged" as my mom calls it, than this batch of mashed potatoes I made today cooking them in a smaller amount of water. My mom always said, cooking them in a small amount of water (basically creating a steam bath) will give you better mashed potatoes. I think it's true and it makes sense too. If you cover them entirely with water I think you are basically boiling off many of the starches and flavors and filling them with water. The key is to use just a few cups of water while keeping an eye on the water level as they cook to make sure you water doesn't completely evaporate, or yes they will burn. 
My Grandpa was a potato farmer so I hope my family knows a thing or two about cooking potatoes :). Growing up, we rarely missed a Sunday of meat and potatoes. My mom always made a Sunday roast and served mashed potatoes with gravy alongside it. And as far as instant potatoes go, I didn't even know that they existed until my late teens because my mom didn't believe in them. 
I've adapted what my mom taught me about making mashed potatoes to go along with a few ideas of my own, to create what I believe are the perfect mashed potatoes. This was always one of those recipes of my mom's that was a bit of this and a little of that until the consistency was where she wanted. She didn't ever heat the milk and cream but I like to so the potatoes don't cool off so quickly. I also decided to add the butter first, while mashing and before the liquids are added because it seems to give them a silkier and creamier texture. The butter seems to adhere to the potatoes. These are the potatoes you are going to want to serve this Thanksgiving, covered with that homemade Turkey gravy. I'm telling you my mom has always made the best potatoes! They are amazingly creamy, silky, fluffy and smooth, with just the right amount of richness and an incredibly delicious flavor. They are Heavenly. Enjoy! 


Mom's Mashed Potatoes
Yields about 8 servings

4 lbs Russet Potatoes (about 8 medium potatoes)
1/3 cup butter, melted
1 cup heavy cream
1/2 cup milk, preferably 2% or whole
1/2 cup sour cream
1 tsp salt, then to taste
freshly ground black pepper to taste

Directions:
Peel, rinse and dice potatoes into large chunks (I diced my medium potatoes into 6 pieces total). Fill an 8 quart saucepan with 2 2/3 cups cold water (pan should have about 1/2-inch of water). Add diced potatoes to cold water. Heat potatoes over high heat, stirring occasionally, until water begins to boil. As soon as water begins to boil, reduce heat to medium high and cover pan with lid and cook about 20 - 25 minutes, stirring once halfway through cooking and keeping a close eye on the water level (2 2/3 cups was the perfect amount for me, but if your pan doesn't have a fairly tight fitting lid then a lot of water may evaporate and escape so you may need to add about 1/2 cup more hot tap water to prevent potatoes from burning), until potatoes are very tender when pierced with a fork. During the last few minutes of cooking potatoes, heat heavy cream, milk and sour cream in a small saucepan over medium high heat until very warm, whisking occasionally.
Remove cooked potatoes from heat and strain any excess water from potatoes. Pour strained potatoes into a large mixing bowl. Pour melted butter over potatoes and mash potatoes with a potato masher until smooth, about 2 - 3 minutes (I wouldn't recommend using a wire type potato masher). Pour 3/4 of the very warm cream mixture over mashed potatoes, season with 1 tsp salt and pepper to taste then using and electric hand mixer on low speed blend until well combine (adding more salt as desired). Then increase speed to medium-high speed and whip for about 2 - 3 minutes, adding remaining cream mixture as desired to reach desired consistency (if you like thick mashed potatoes you may not want to add it, and if you like them thin you can add a little more milk to thin as desired), until potatoes are fluffy and smooth. Serve warm topped with gravy or butter if desired.


Continue on to Suzanne's at You Made That?

What's Cooking With Ruthie
Six Sister's Stuff The Mother Huddle
Inside BruCrew Life
Cooking Classy
You Made That?
A Pretty Life in the Suburbs
The Sisters Cafe
Jamie Cooks it Up

It wouldn't be a party without a door prize now would it?  Using the rafflecopter below put your name in the "hat" for a $200 gift card to 1 store of your choice: Target, Kroger, or Walmart - to cover your Thanksgiving dinner.  That's right, we're going to pay for someone's Thanksgiving dinner! To enter just pin this page to Pinterest.  For a couple more entries you can follow the new Pinterest board Simple And Delicious Weeknight Meals, and follow the newSimple and Delicious Weeknight Meals Facebook Page.  Won't these be handy for the busy Holiday weeknights?

Open to US Residents only. See terms for alternate entry. Winner will be notified by email on November 10, 2012.


a Rafflecopter giveaway
Share:

Monday, October 29, 2012

Chicken Pot Pie Crumble - My Favorite Pot Pie


You are looking at a must try comfort food meal. I was never a fan of chicken pot pie until a friend so kindly brought me this dish after I had my baby a few years ago. I'm fully in love with it! Rather then getting a surrounding of heavy pie crust you get a fluffy biscuit topping that will quickly have you loading your plate with a second round. In my opinion the topping is what makes this dish. It sets it apart from it's competitors, being loaded with Parmesan cheese, plenty of heavy cream, some black pepper and cayenne pepper for a slight kick, and I also added a little garlic powder (because how can I resist?). Then to finish, it's browned in the oven to beautifully golden perfection. 
And the wonder doesn't just end at the topping. That is just the beginning. It's loaded with fresh, sauteed veggies, fall apart tender chicken which is all tossed in a creamy white sauce. This hearty dish would also be incredible made with leftover turkey from your upcoming Thanksgiving feast. 
I love how this is your entire meal in one dish. The main course with the chicken, the side with its generous portion of veggies and a bread with that unbelievable topping. I love how the slightly tangy flavor from the Parmesan cheese will keep people wondering what delicious ingredient that incredible flavor is coming from. 
This meal will remind you of what a classic, simple, just plain good meal is intended to be. Enjoy!


Chicken Pot Pie Crumble
Yields about 5 - 6 servings

Ingredients:
20 oz. boneless skinless chicken breast halves (about 2 large)
1 (14.5 oz) can low-sodium chicken broth
1 Tbsp olive oil
1 cup peeled and diced carrots (about 2 large carrots)
3/4 cup diced celery (about 2 large stalks)
3/4 cup finely diced yellow onion (about 1/2 medium onion)
2/3 cup frozen peas
3 Tbsp butter
1/3 cup all-purpose flour
3/4 cup milk
1 tsp lemon juice
1 1/2 tsp dried parsley
1/4 tsp dried thyme

For the crumble:
1 1/2 cups all-purpose flour
1 1/2 tsp baking powder
1/2 tsp salt
1/4 tsp freshly ground black pepper
1/4 tsp garlic powder (use 1/2 tsp for a slightly stronger garlic flavor)
1/8 tsp cayenne pepper (optional)
1/4 cup butter, cold and diced into small cubes
2 oz. finely shredded Parmesan cheese (about 1/2 cup packed)
3/4 cup + 2 Tbsp heavy cream

Directions:
Place chicken in a slow cooker, pour chicken broth over chicken. Cover with lid and cook on low heat about 5 - 6 hours until chicken is cooked through. Remove chicken from slow cooker, dice and set aside. Strain broth from slow cooker through a fine mesh strainer into a bowl and reserve broth (if you don't have a fine mesh strainer just try to remove the pieces of fat). 
To prepare crumble: Preheat oven to 450 degree. In a mixing bowl, whisk together flour, baking powder, salt, pepper, garlic powder and optional cayenne pepper. Using your finger tips, cut butter into mixture until mixture resembles coarse crumbs. Stir in Parmesan cheese. Pour in heavy cream and mix just until combine. Break and drop mixture into 1 - 2-inch pieces onto a Silpat lined baking dish. Bake in preheated oven for 10 minutes until golden. Remove from oven and set aside.
To prepare filling: Heat olive oil over medium high heat. Once hot, add diced carrots, onion and celery. Saute vegetables, stirring occasionally until lightly golden and tender, about 5 - 6 minutes. Pour vegetables into a bowl and set aside. Reduce heat to medium, melt butter in saucepan (I like to brown it a bit for and extra layer of flavor), then add in flour and cook, stirring constantly for about 20 seconds (it will be very thick). While stirring, slowly add in milk followed by reserved chicken broth, lemon juice, parsley, thyme and season with salt and pepper to taste. Bring mixture just to a boil,  then slightly reduce heat and allow to cook about 1 minute longer until thickened, stirring constantly. Remove sauce from heat and add sauteed vegetables, frozen peas and diced chicken to sauce, then toss to evenly coat. Pour mixture into a 9-inch pie dish and sprinkle with baked crumble topping (mine fit perfectly in my pie dish but if yours is coming close to the top edge you may want to sit it on top of a cookie sheet to prevent spills in your oven). Bake in 400 degree oven until nicely golden about 12 - 14 minutes. Serve warm.

Recipe Source: adapted slightly from Cook's Illustrated, and yes I omitted the tomato paste and soy sauce =)
Share:

Blog Archive