Friday, August 31, 2012

Pumpkin Pie Oatmeal with Caramel Sauce


What do you get when you combine oats, pumpkin, caramel, and walnuts along with some sweet spices? You get a nutritious and incredible breakfast with three, yes three Superfoods (some may say four if you count the cinnamon)! And the best part, it tastes like pie. I will admit there is quite a bit of sugar in this recipe but if it didn't have it just wouldn't be near as good. At least it has a lot less than the real thing =). 
Many of us are always labeling recipes with "Christmas morning breakfast," well what about Thanksgiving or even Halloween breakfast? The other holidays should have their own fancy breakfasts too, and I think this would make the perfect fit. 
Indulge a little and be sure to get a drizzling of the caramel sauce with every bite. In my opinion a pumpkin pie shouldn't be left without some kind of caramel sauce or dulce de leche, to me they are just meant to go together. That's why I would say don't omit the caramel sauce, it's a must. It's the highlight of this recipe. Enjoy and indulge in the flavors of fall!


 ...like I said, every bite needs a little bit of caramel sauce

Pumpkin Pie Oatmeal with Caramel Sauce
Yields 1 serving

Ingredients:
1/2 cup rolled oats
2/3 cup milk
1/4 cup buttermilk*
1/4 cup canned pumpkin puree
1 Tbsp light-brown sugar
1/4 tsp cinnamon 
1 pinch nutmeg
1 pinch ginger
1 dash salt
1 - 2 Tbsp caramel sauce or caramel ice cream topping
1 Tbsp chopped walnuts or pecans, optional

Directions:
In a large microwave safe bowl, whisk together oats, milk, buttermilk, pumpkin puree, light-brown sugar, cinnamon, nutmeg, ginger and salt. Microwave mixture on HIGH power for 3 1/2 minutes, then allow oatmeal to rest a few minutes (for a thinner consistency, if desired, pour in additional milk or you could use half and half). Drizzle oatmeal with caramel sauce and sprinkle with optional chopped nuts. Serve warm.

*or an additional 1/4 cup milk plus 3/4 tsp lemon juice

Recipe Source: Cooking Classy
Share:

Thursday, August 30, 2012

Cheesy Bacon Ranch Potato Soup


I didn't know traditional creamy potato soup could get any better! I love a warm bowl of homestyle potato soup, which is why I decided to give it an upgrade. I grew up eating a lot of meat and potato meals. I don't think my mom ever missed a Sunday dinner of roast beef and mashed potatoes (and NEVER the instant potatoes, I didn't even know they existed growing up). So, basically potatoes are one food I could never part with. One of my favorite dinner sides is Twice Baked Potatoes. 
The inspiration for this soup came from those incredibly delicious Twice Baked Potatoes, those dreamy, creamy potatoes that are loaded with Cheddar cheese, sprinkled with browned crispy bacon and chopped green onions then they're finished off with a generous drizzling of creamy Ranch dressing. Yeah, all of that in soup form and this soup better be good right? It's definitely my new favorite potato soup, I'm not sure if I'll be able to eat the traditional plain old potato soup anymore. This stuff is just too flavorful and cheesily delicious to look back to that soup again =). 
This recipe may seem a little different, I didn't make a roux to add the flour, rather I whisked it into the milk. I didn't want to add butter because the mayonnaise already replaced the fat and creaminess of what butter would do. I also chose to use sharp cheddar cheese because in my opinion when you use sharp you can use less cheese (then if you were to use mild or medium) and therefor you're adding less calories (don't get me wrong this isn't a low calorie soup, I just try to lightly reduce calories where I can). I decided to leave the carrot and celery out of this recipe so it's more like a loaded or twice baked potato but if you really wanted to you could add them.
If you want even more of a ranch flavor you could drizzle the top of the soup with additional ranch, made according to the directions on the package. I hope you love this soup as much as I do and make it often this upcoming fall and winter season! There's nothing like a perfect bowl of soup to warm a cold fall evening. Enjoy! 


Cheesy Bacon Ranch Potato Soup
Yields about 6 servings

Ingredients:
3/4 cup sour cream
1/4 cup mayonnaise
1/4 cup whole milk
1 1/2 Tbsp dry ranch dressing mix

3 lbs Russet potatoes, peeled and diced into about 3/4-1" cubes (about 8 medium potatoes)
1 Tbsp extra virgin olive oil
3/4 cup diced yellow onion (about 1 small onion)
2 cloves garlic, finely minced
2 (14.5 oz) cans chicken broth*
2 cups whole milk
1/4 cup all-purpose flour
6 oz. sharp cheddar cheese, divided (about 1 1/2 cups)
1 oz. finely grated Parmesan cheese (about 1/4 cup)
freshly ground black pepper to taste
10 slices bacon, cooked and chopped (or crumbled if you like it extra crispy)
3 green onions, chopped

Directions:
In a mixing bowl, whisk together sour cream, mayonnaise, 1/4 cup milk and ranch seasoning mix. Cover bowl and refrigerate. 
Heat olive oil a large cast iron dutch oven over medium high heat. Add onion and saute about 4 minutes until golden, add garlic and saute 1 more minute. Add chicken broth and diced potatoes and bring mixture just to a boil, then reduce heat to medium, cover pot and cook 15 - 20 minutes until potatoes are very tender. 
In a mixing bowl, whisk together 2 cups milk with 1/4 cup flour (whisk very well to break up flour) and pour mixture into soup. Increase temperature to medium high heat, and bring mixture just to a boil, stirring constantly (stirring constantly will help break down the potatoes a bit). Once mixture reaches a boil, reduce heat to low, add ranch dressing mixture from refrigerator, 1 cup (4 oz) grated Cheddar cheese, grated Parmesan cheese and season with black pepper to taste. Cook about 5 minutes, stirring frequently (note, if you want smaller potato chunks in the soup you can simply mash the soup with a potato masher to break them down a bit more). Serve warm, sprinkle each serving with remaining 1/2 cup cheddar cheese, chopped bacon, and chopped green onions. 

*you can use low sodium chicken broth if you prefer, for this recipe I just used regular and didn't add any salt to the soup. If you use low sodium you may want to add additional salt to the soup.

Recipe Source: Cooking Classy
Share:

Wednesday, August 29, 2012

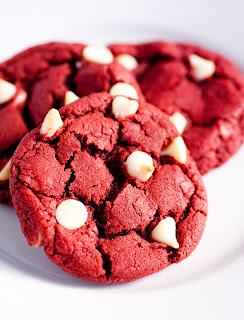
Red Velvet White Chocolate Chip Cookies


Some may save red velvet for a special occasion, I say any day is a great day for red velvet! No special occasion needed. I made some Red Velvet Cupcakes last week for a friend who was hosting a birthday party and it inspired me to create another red velvet dessert. These cookies are a combination of two of my all time favorite desserts, those Red Velvet Cupcakes and Chocolate Chip Cookies. 
These lightly chocolaty, deliciously chewy, gorgeously red cookies are simply fantastic!  In my opinion red velvet isn't chocolate, if I wanted a chocolate dessert I'd make a chocolate dessert. Red velvet to me is a combination of vanilla and chocolate, one shouldn't really overpower the other. That's why when I make red velvet recipes they are somewhat mild on the cocoa. Plus when you use too much cocoa it depletes that beautiful red color, it turns it more of a brownish auburn shade rather than a velvety red. I also tried making these cookies with half brown sugar and half granulated sugar and that even hid the red color due to the deep brown shade of the molasses in the brown sugar, so the brown sugar was out. 
These cookies would also be delicious if you were to omit the white chips and instead frost them with Cream Cheese frosting. If you personally prefer a really chocolaty red velvet, I would say rather than adding more cocoa to the dough just add milk chocolate or semi sweet chocolate chips in place of the white chocolate chips.
And to all you early holiday Pinners out there (I'm definitely not talking about myself =), these would go great on the Christmas or Valentines Day list. Enjoy!


{Updated} Red Velvet White Chocolate Chip Cookies***
Yields about 3 dozen

Ingredients:
2 1/4 cups all-purpose flour

2 1/2 Tbsp cocoa powder*
1 1/2 tsp cornstarch
3/4 tsp baking soda
1/2 tsp salt
8 Tbsp butter, at room temperature
6 Tbsp all vegetable shortening, at room temperature
1 1/2 cups granulated sugar
1 large egg
1 large egg yolk
1 1/2 tsp white vinegar
1 1/2 tsp vanilla extract
1 Tbsp red food coloring
1 1/3 cups white chocolate chips, divided

Directions:
Preheat oven to 375 degrees. In a mixing bowl, whisk together flour, cocoa powder, cornstarch, baking soda and salt, set aside. Add butter, shortening and sugar to the bowl of an electric stand mixer and mix on medium speed until very pale and fluffy about 4 minutes. Add egg and egg yolk and mix until combine. Add vinegar, vanilla and food coloring and mix until well blended. Slowly add in dry ingredients and mix just until combine. Mix in 1/2 cup white chocolate chips. Scoop dough out by the heaping tablespoonfuls (about 1 1/2 Tbsp) and roll into balls and place on buttered or Silpat lined cookie sheets. Gently press about 6 white chocolate chips into the top of each cookie, being careful not to flatten the cookies (if you do flatten them a bit just reshape them to the height they had before adding the chips) and bake in preheated oven 8 - 9 minutes. Allow to cool several minutes on baking sheet before transferring to a wire rack to cool. Store cookies in an airtight container.

*If you want a more chocolaty cookie you could replace 1 - 2 Tbsp flour with an additional 1 -2 Tbsp cocoa, the red just won't be quite as vibrant. Or, you could replace the white chocolate chips with chocolate chips.

**Note: this recipe has been completely revised as of 9/7/12 due to comments stating cookies are flat and not red enough. I myself thought them to be flat. This recipe completely eliminates both of those issues. These are thick, vibrantly red and completely delicious (they better be, these were my 4th batch. Fourth times a charm right =).

***Anyone wanting the original recipe I posted back in August, I finally found it thanks to Break It, Make It, or Bake it, thanks Audrey! She posted it before I had deleted my first version and added in the revised version above. To be honest I like the ones below best I just got a few complaints that they were flat and not red enough so I added the recipe above in hopes of solving the issue for the complaints. The recipe below is also the ones that are pictured:

{My Original} Red Velvet White Chocolate Chip Cookies

Ingredients:
1 1/2 cups all-purpose flour
2 1/2 Tbsp cocoa powder
1 tsp cornstarch
3/4 tsp baking powder
1/4 tsp salt
1/2 cup butter, softened
1 cup granulated sugar
1 tsp distilled white vinegar
1 large egg
1 1/2 tsp vanilla extract
1 1/2 tsp red food coloring
3/4 cup white chocolate chips, divided

Directions:

Preheat oven to 375 degrees. In a mixing bowl whisk together flour, cocoa powder, cornstarch, baking powder and salt, set aside.
In the bowl of an electric stand mixer fitted with paddle attachment, whip together butter, sugar and vinegar until pale and fluffy, about 3 - 4 minutes. Mix in egg. Add in vanilla and red food coloring and mix until blended. With mixer set on low speed, slowly add in dry ingredients and mix just until combine. Mix in white chocolate chips (note: I mixed in half of the white chocolate chips then set aside the other half to press into the tops of the rolled dough balls so more of them show through when baking...but I just noticed over at Gonna Want Seconds that she just pressed some extra white chocolate chips into the tops of cookies AFTER baking, genius!). Scoop dough out by the heaping tablespoonfuls and shape into balls. Transfer to Silat or parchment paper lined baking sheets and bake in preheated oven 9 - 11 minutes. Allow to cool on cookie sheet before transferring to a wire rack to cool. Store cookies in an airtight container. 

Recipe Source: Cooking Classy


Share:

Monday, August 27, 2012

Pumpkin Bars with Fluffy Cream Cheese Frosting


I just couldn't wait any longer. I say it's officially time for a Fall inspired post. I love all the flavors of Fall. The aromatic spices, the caramel apples, the pumpkin pie and the fresh off the cob corn. One of my favorite Fall flavors is pumpkin. It's natural sweetness and moisture along with it's power packed nutrition makes it a perfect choice for countless dishes and desserts. 
I created this recipe to be a thicker bar than my banana bars because I received several comments of people saying they'd like a thicker bar. These are basically the same thickness of cake, so you can call it pumpkin cake if you'd like. I chose to make this a bit lower fat than your average pumpkin bar by using half butter and half applesauce (rather than all butter or  oil). You would never know it is halfway healthy =). I love when I can turn a Superfood into a dessert (if you top them with walnuts you can get two Superfoods between the pumpkin and walnuts). Try these bars and they are likely to become one of your new favorite fall desserts!


Pumpkin Bars
Yields about 20 bars

Ingredients:
2 cups all-purpose flour
1 tsp baking powder
1/2 tsp baking soda
1/2 tsp salt
2 tsp ground cinnamon
1/2 tsp ground nutmeg
1/2 tsp ground ginger
1 cup light-brown sugar
3/4 cup granulated sugar
1/2 cup butter, melted and whisked to cool slightly
1/2 cup applesauce
3 large eggs
2 tsp vanilla extract
1 1/2 cups canned pumpkin
Cinnamon and whole or chopped pecans, for garnish (optional)

Directions:
Preheat oven to 350 degrees. In a mixing bowl, whisk together flour, baking powder, baking soda, salt, cinnamon, nutmeg and ginger, set aside. In a separate large mixing bowl, using an electric hand mixer, blend together light-brown sugar, granulated sugar, melted butter and applesauce until well combine. Add eggs and vanilla extract and mix until well blended, then add pumpkin and mix until well blended. Add dry mixture and mix just until combine. Pour and spread mixture evenly into a buttered 13 x 9 inch baking dish and bake in preheated oven about 35 - 38 minutes until toothpick inserted into center of cake comes out with a few moist crumbs attached. Allow bars to cool completely (I covered the baking dish after 15 minutes of cooling to seal in moisture) then cut into bars and frost with Fluffy Cream Cheese Frosting (alternately you can frost bars first then cut into squares) and dust lightly with optional cinnamon and garnish with optional pecans.

Fluffy Cream Cheese Frosting

Ingredients:
1/3 cup butter, softened
6 oz cream cheese, softened
1/2 tsp vanilla extract
3 cups powdered sugar

Directions:
In a large mixing bowl, using and electric hand mixer, whip together butter and cream cheese on medium speed until very light and fluffy, about 3 -4 minutes. Mix in vanilla. Add powdered sugar and mix until well blended and smooth.

Recipe Source: Cooking Classy
Share:

Blog Archive